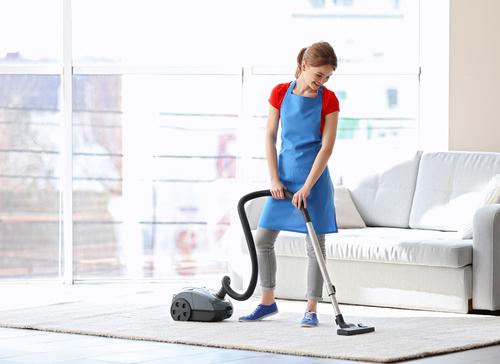
Vacuum cleaners are small but mighty appliances that are easy to use and even easier to maintain. The right vacuum upkeep can be an incredible investment in your home and health. This can help keep your house free from dirt, allergens, and dust while providing a clean and spotless appearance.
All too often, though, we forget that our vacuums need a little TLC themselves—especially since they’re doing the heavy lifting of cleaning. If you don’t clean your vacuum regularly, you spread around the dust and germs that your vacuum is supposed to be cleaning up. The vacuum can also get clogged and backed up. Clogs can cause a loss of suction power and damages to the hose, canister, and belt.
Regular and routine maintenance can extend the life of the vacuum cleaner from an average five to eight years to ten or even fifteen years. This saves you money and time while letting you keep your beloved vacuum that works so hard for your home.
Below we’ll go through the steps for cleaning, storing, and using your vacuum to maintain the lifespan of your vacuum for years to come.

How To Clean Your Vacuum
Be sure to follow the care instructions from your vacuum’s manufacturer. The below is a general guide for an overall eco-friendly cleaning.
Psst… Check out The Spurce’s 10 Best Vacuum Cleaners To Buy In 2018.
1. Unplug.
Make sure to unplug the vacuum before cleaning. Avoid getting any water, rubbing alcohol, or vinegar on the electrical parts of the vacuum.
2. Clean the canister.
Remove the canister from the vacuum. Empty the vacuum canister or bag into the garbage. If the bag is disposable, throw out the bag and replace it. If the bag or container is reusable, empty it into the trash. We recommend emptying outside or in the garage to avoid dust exploding in your home.
To clean a reusable vacuum canister or bag, start by rinsing it in the sink with warm water. You’ll want to disinfect the canister thoroughly, as this is the part of the vacuum that collects gunk and grime. You can either wash the bag with a strong-powered dish soap or vinegar solution (one part white vinegar to two parts water).
Throw out the sponge or paper towels you used to clean the canister, as these can collect the germs from inside the canister. You should also disinfect the basin of your sink with a white vinegar solution.
Make sure the canister is completely dry before putting back into the vacuum. If there is any moisture, mold can grow inside of your vacuum.
3. Clean the beater bar.
Lay the vacuum on the side. Disassemble the parts. Find your vacuum’s beater bar, which is the rotating brush inside the vacuum cleaner’s head. This can get clogged with hair, yarn, and other long pieces.
Use scissors to carefully cut out any hair or strings tangled in the beater bar. Soak a cotton pad in rubbing alcohol and swipe along the beater bar. This will help disinfect and remove any additional dirt or dust.
Another option is to spray the brush with a diluted vinegar solution. Make sure to spin the brush around to clean all sides. Avoid spraying vinegar on the rubber belt, as acid is too strong for rubber.
You should also check the beater belt for cracks or wear. You may need to replace the brush if damaged. You should also replace the vacuum belts if cracked, dented, or worn down.
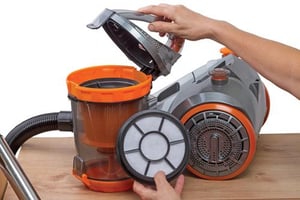
4. Clean the filter.
Remove the filter from the vacuum. Most filters are reusable but should be replaced every six months. If there is a musty odor when you use your vacuum cleaner, the filter needs to be changed.
Wash the filter in a similar way to the vacuum canister. Rinse with warm water in the sink. You can then wash using a vinegar solution of one part vinegar to two parts water. This will help disinfect and remove odors from the exhaust. Leave to dry completely before reinserting into the vacuum.
5. Clean the vacuum bottom.
You should disinfect and sanitize the bottom of your vacuum and vacuum attachments after every use. This is the part of the vacuum that touches the germs—which means it can also spread germs.
Soak a cotton pad in rubbing alcohol. Rub on the bottom of the vacuum cleaner to instantly disinfect.
6. Clean the hose.
If your vacuum has a detachable hose, detach it before cleaning.
You want to reach all of the nooks and crannies inside of your hose. Wrap a broom or mop handle in paper towels held on by strong duct tape. Dampen—but wring out—the paper towels with a white vinegar solution (one part white vinegar to two parts water). The vinegar will help kill bacteria and remove odors.
Gently insert the handle into the hose and swirl around inside. Be careful not to move too aggressively as this can damage or crack the hose.
Let the vinegar dry before turning on the vacuum. If you don’t, the liquid will get sucked up and could damage the electrical parts of the vacuum. You’ll know the vinegar is dry when the odor is completely gone. We recommend waiting at least 24 hours.
You can also use the same process with dryer sheets. Wrap a broom or mop handle in dryer sheets, held on by duct tape. Be gentle when you insert the handle into the hose. Dryer sheets will help clean, sanitize, and remove odors. This also helps make a frictionless suction, improving cleaning power.
7. Wipe down the exterior.
Use a microfiber cloth to wipe down the exterior of the vacuum cleaner. This helps remove any additional dust or debris. You can add a spritz of white vinegar solution or all-purpose cleaner to the cloth for added power.

How To Use Your Vacuum
- Always store your vacuum upright. If possible, wrap the hose around a hook on the door or wall to keep it off the floor. This helps prevent cracks and clogs.
- Don’t let the vacuum bag or canister fill up more than 3/4 of the way. This can cause clogs and damage.
- If possible, clean out the vacuum canister or bag after every use to avoid clogging.
- Rub the end of the vacuum hose with wax paper. This will prevent any attachments from sticking during attachment and removal process.
- Make sure to remove small objects from the floor before vacuuming to avoid sucking up any items that could damage the workings of your vacuum.
- If you own a HEPA vacuum cleaner, you can actually use it to remove allergens and dust in the air. After cleaning, leave the vacuum on in the room for 3-5 minutes. (Don’t forget that it’s on.) The HEPA filter can actually help make the room’s air fresher and cleaner.
The Bottom Line
Taking care of your vacuum on a regular basis will maintain the lifespan of your appliance for years to come. Vacuum upkeep helps preserve suction power that will keep your floors, walls, ceiling, and furniture healthy and dust-free.
Check out Floorcare’s wide range of vacuum parts and replacements. With our help, you can always have a powerful vacuum to maintain the health and cleanliness of your home!
Not sure which parts you need for maintenance of your vacuum? No problem!
Contact Floorcare right now for a conversation about your vacuum needs!


0 comments